User Tools
Site Tools
Sidebar
Move an object up and down continually
This article was written for “UniVCI-0.15.”
Example data
https://virtualcast.jp/products/261f816bcc4148a436b964d88691876721852a93d3b904300ec233ac2d16ff3d
To run a process continually while a VCI is present, use “update” function.
For the up and down movement, let's use math.sin function to move the object smoothly.
As we don't have to synchronize this with other users, let's use FrameCount in “vci.me(ExportMe)(Local information).
“FrameCount” is the number of frames executed since the launch of the local client.
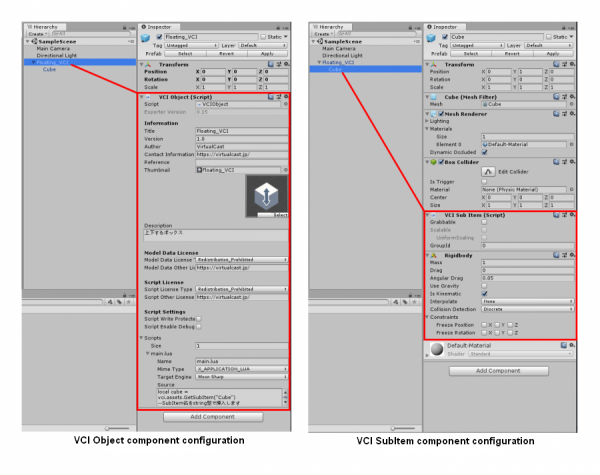
1. Create a new GameObject and create a Cube as its child.
In this example, we named the GameObject “Floating_VCI”, but it can be anything really.
Let's name the Cube “Cube.” Specify Y-axis value of the Cube to 1 so that it doesn't go through the floor.
2. Attach the “VCI Object” component on the GameObject,
and attach the “VCI SubItem” component on the Cube.
When doing this, a “RigidBody” component is also attached automatically.
As we won't be using gravity, turn off Use Gravity and turn on Is Kinematic.
3. On the VCI Object component in the GameObject, set the Scripts Size as 1.
Enter “main.lua” in the Name and paste the script shown below.
- main.lua
-- Virtual Cast 1.5.1a
local cube = vci.assets.GetTransform("Cube")	--Insert the name of the SubItem as a string
local basePosition = cube.GetLocalPosition()	--The initial position of the Cube
local speed = 0.1	--speed
local range = 0.1	--move range

function updateAll() -- Virtual Cast 1.5.1a Called in all users regardless of the ownership

    if cube.IsMine then -- Virtual Cast 1.5.1a. The owner takes the responsibility to move the object
	local addPosition = Vector3.__new(0,math.sin(vci.me.FrameCount * speed * range),0)	--The position to add
	cube.SetLocalPosition(basePosition + addPosition)
    end
end
For details of each component settings, see the image below.


