This translation is older than the original page and might be outdated. See what has changed.
Sidebar

en:vci:make
Table of Contents
How to Create VCI
Now that the VCI development environment is setup successfully, we can start creating VCIs.
In this tutorial, we will create a basic cube item. However, to create something unique, you need to prepare some assets.
You can use the following assets in VCI.
- 3D data (.fbx, .obj, .glb, etc.)
- 3D data (.png, .bmp, etc.)
- Audio (.wav, .ogg, .mp3, etc. It will be stored as wav, so be aware of the file size)
- Animation (Creation on Unity Editor is recommended)
- Lua script
Create an example item
This tutorial starts from the point where you created [VCI_sample] Scene in Importing VCI UnityPackage.
Now, let us create an example item to be used in this tutorial.
Create a root object
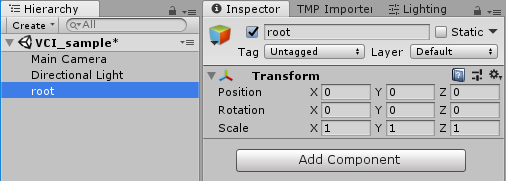
1. Right-click in the Hierarchy section to open context menu.
2. Select [Create Empty] to create an empty game object.
3. Change its name to something easy to recognize.
In this tutorial, we will name it “root.”
Note: Just in case, set the Position and Rotation of transform to (0,0,0), and Scale to (1,1,1).
Configuration of VCIObject

1. After you made sure you selected the “root” in the Hierarchy, click [Add Component].
Search “VCIObject” and select [VCIObject] to add it to the Inspector.
2. For this VCI example, set the parameters as follows:
Title: VCIsample
Version: 1
Author: test
Description: For tutorial
Note: Other fields can be left as is
About the Information you configure in VCI Object
They are options to manage information such as author, icon and license.
For information on each item, see Details on VCI components.
Create a subitem
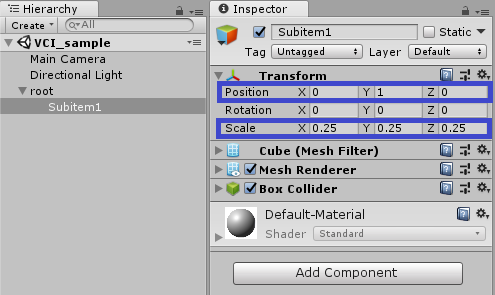
1. While the “root” is selected in the Hierarchy, right-click to open the menu.
2. Create cube by selecting [3D Object] > [Cube].
3. Change the name of the cube to “Subitem1” .
Note: Make sure to name it “Subitem1” as we will be referring to it later in this tutorial.
4. Set the Y value of [Position] to 1.
5. Set all values of [Scale] to 0.25.
About the scale setting
The default cube in Unity is 1 ㎥ by default. When you see it in VR, it will be shown as 1 ㎥object in real life.
When you adjust the Scale, it is useful to place an avatar side-by-side with the object to get the feel of its size.
In this tutorial, we adjusted the size of the cube to 0.25 ㎥ as 1 ㎥ was too large.
Configuration of VCISubItem

1. After you made sure you selected the “Subitem1” in the Hierarchy, click [Add Component].
Search “VCISubItem” and select [VCISubItem] to add it to the Inspector.
[Rigidbody] will also be added automatically.
2. On [VCISubItem], tick the [Grabbable] to enable it.
This allows you to grab the object.
3. On [Rigidbody], un-tick the [Use Gravity] to disable it.
This is a parameter for gravity, which will disable the gravity affecting SubItem, thus making it float in the air.
You can choose whichever option, depending on how you want the object to behave.
About the collider
To make an object grabbable, you need both [Rigidbody] and [Collider].
Collider is a component that detects collisions, while Rigidbody is a component to calculate the physics.
Unity allows you to “grab” an object by combining the work of these two components.
For the list of colliders that can be used for VCI, see Usable unity components.
Configuration of Material
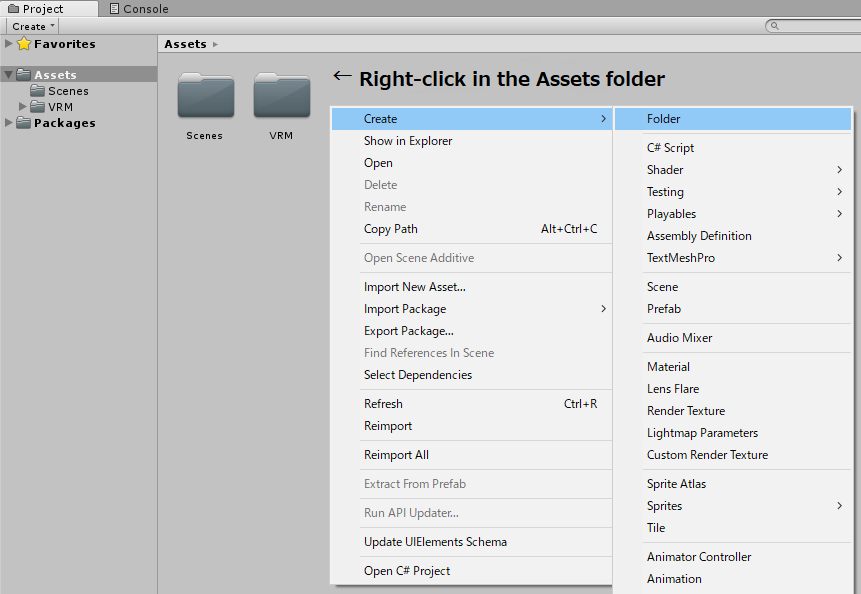
1. In [Project] tab, under [Assets] folder, right click to open context menu.
Select [Create] > [Folder] to create a “New Folder.”
Name it something recognizable, like “Material.”
2. In [Assets] > [Material] folder, right click to open context menu.
Select [Create] > [Material] to create a “New Material.”
Name it something recognizable like “Subitem1”.
Now, you have made the material to set on the VCI item.

3. Select the Material you just created and change the [Shader].
For VCI items, you must choose from the one in [UniGLTF] or [VRM/MToon].
For this tutorial, we will use [UniUnlit].
| UniGLTF | |
| StandardVColor | Standard Shader for VRM CVI。 Renders shadow. |
| UniUnlit | Unlit Shader for VRM VCI. Unlit means it doesn’t render shadow. |
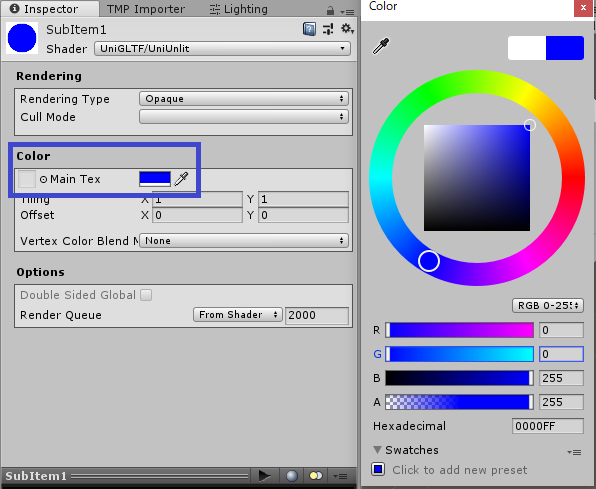
4. On [Inspector], you can change the color of the Material by clicking on the color picker beside the [Color].
You can choose any color you like. I chose blue.
To use a texture, assign a texture to use from [Main Tex].
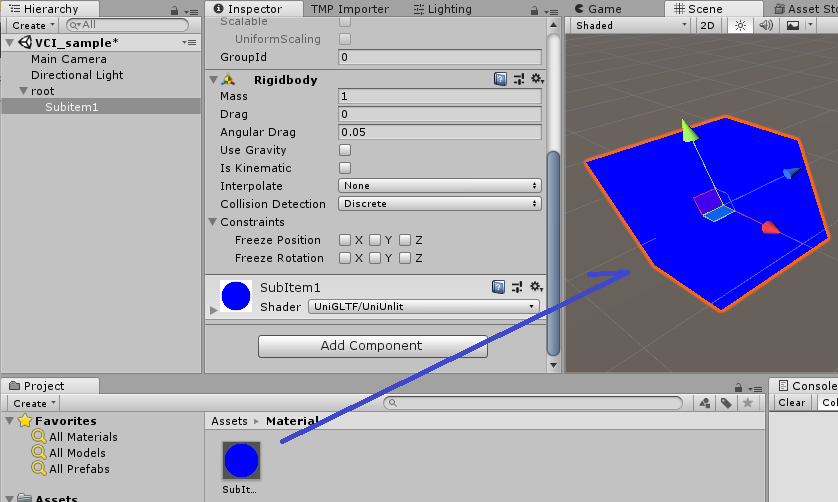
5. To apply the Material, drag and drop the Material on the object in the Scene tab.
The Material should be applied and the color changes.
And now we have completed the steps to create a basic VCI.
Export VCI and save it
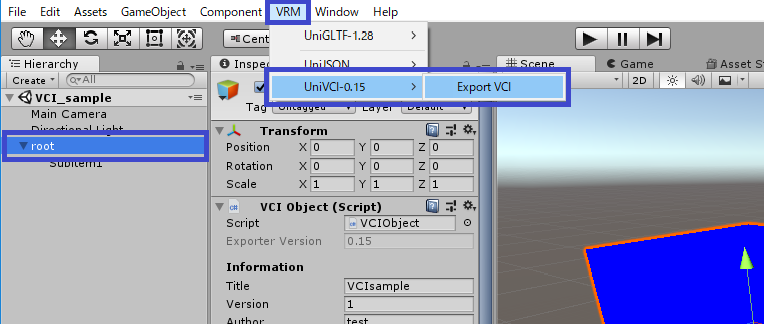
1. Click on the VCI game object in the Hierarchy to make sure it is selected.
2. On the Unity menu bar, select [VRM] > [UniVCI-x.x] > [Export VCI].
3. Select the destination folder, name the file “VCIsample” and save it.
To debug the script, tick on [Script Enable Debugging] checkbox.
About the hierarchy of game objects
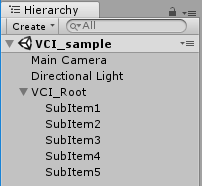
Create only one game object to be the “root” of VCI.
You can add as many SubItems as you like in hierarchy under the root.
SubItems must be placed directly under the root.
Note: You cannot place SubItems under a SubItem.
Note: You could add objects that are not SubItems under a SubItem. Those objects cannot be referenced from scripts, but they can be used for decorative meshes.
A VCI could be a single object like dice, or it could consist of multiple objects like a deck of cards.
Therefore, one VCI doesn’t necessarily mean it’s one object (or a SubItem). Instead, you could include multiple objects (SubItems) in a single VCI. (There is a limit though)
en/vci/make.txt · Last modified: 2022/09/05 18:02 by pastatto