This translation is older than the original page and might be outdated. See what has changed.
Sidebar

en:vci:sample:material:transparent
Table of Contents
Make an item appear and disappear (Using transparent texture)
This example demonstrates how to show and hide an item using a transparent portion of a texture.
The item doesn't actually disappear, it just looks like it's being disappeared.
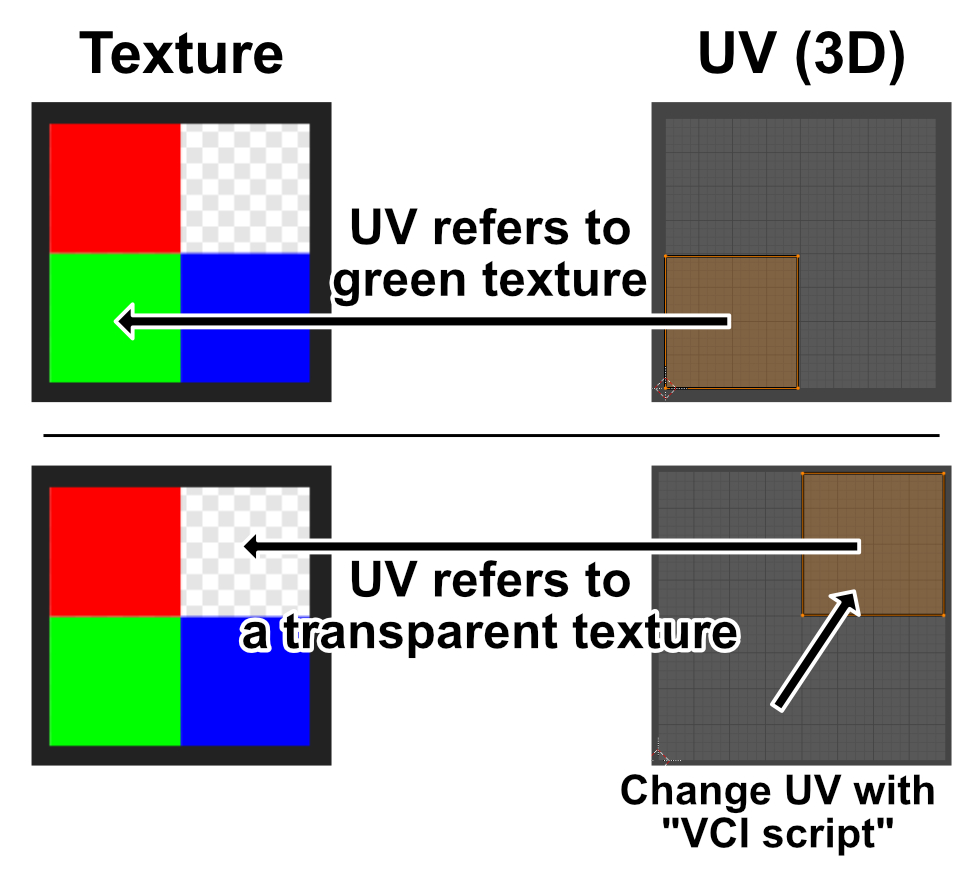
The principle of becoming transparent
Material data
![]()
- Create a png texture with transparent area.
There are other image formats like jpeg and bmp, but png is the format that supports transparency.
- Prepare a 3D model you want to hide.
Make the UV of the 3D model fit the transparent area of the texture created in step 1.
You can make the object looks like it's disappeared by shifting the UV area to the transparent part of the texture using VCI script, so we recommend you to place the UV and the transparent portion of the texture on easy to recognize place.
Component setting
![]()
- To use a transparent texture, change the Shader of the material to UniGLTF/UniUnlit.
Change the RenderingType to Transparent and check in the Preview that the transparent area can be sighted. - For the SubItem, apply the material created in the step 1 on the 3D model you want to hide.
Enable Grabbagle, enable IsTrigger on the collider, and disable Gravity of the Rigidbody.
VCI script
- main.lua
local _TransparentIsActive = false

function onUse()
    TransparentChange()
end

function TransparentChange()

    -- If it's transparent, change to opaque
    if _TransparentIsActive == true then
        local offset = Vector2.__new(0, 0)
        -- Specify the material name and change the UV
        vci.assets._ALL_SetMaterialTextureOffsetFromName("TransparentMaterial", offset)
        print("opaque")
    end

    -- If it's opaque, change to transparent
    if _TransparentIsActive == false then
        local offset = Vector2.__new(0.5, 0.5)
        -- Specify the material name and change the UV
        vci.assets._ALL_SetMaterialTextureOffsetFromName("TransparentMaterial", offset)
        print("Transparent")
    end

    -- Flip the state
    _TransparentIsActive = not(_TransparentIsActive)

end
VCI Script (Description)
vci.assets._ALL_SetMaterialTextureOffsetFromName()
Specify the material name in the first argument and desired offset value for the UV in the second argument. The UV coordinates of the material specified in the first argument will be shifted.
The script above will offset the UV position to the transparent area, which will make the item transparent, thus it seems like it is disappeared.
For details on this, refer to vci.assets(ExportAssets).
_TransparentIsActive = not(_TransparentIsActive)
You can flip the state of a bool containing either true or false by enclosing it with “not()”.
You can write a toggle switch like behavior that flips the current state using this technique.
The value is flipped every time the “TransparentChange()” is called.
Tips
If a non-transparent portion of the texture becomes visible when the SubItem is far away
When the object is far away from you and the size of the UV and the transparent portion of the texture are fitting perfectly with each other, you might see a non-transparent area of the texture seeping through the edge of the UV.
This is because objects in faraway positions get their textures replaced with lower resolution ones by a feature called mipmap. When the texture resolution is lowered, some of the non-transparent pixels could infiltrate into the visible area.
You can resolve this issue by creating more gaps between the UV and the opaque area by making the UV smaller or enlarging the transparent area.
en/vci/sample/material/transparent.txt · Last modified: 2019/10/04 15:46 by oinari