This translation is older than the original page and might be outdated. See what has changed.
Sidebar

en:vci:sample:image:tutorial
Table of Contents
Import image and apply them on VCI (3D model)
Here are the steps to import an image and use them on a VCI.
Tips on images to use in CG
It is favorable to use 1:1 square images in the size of the square root of two, such as 64, 128, 256, 512 and 1024.
Rectangles and images in other sizes could be used, however, the sizes listed above result in better quality when the image is shrunk.
You could use an image that is not a 1:1 square, but it is not recommended.
Prepare an image
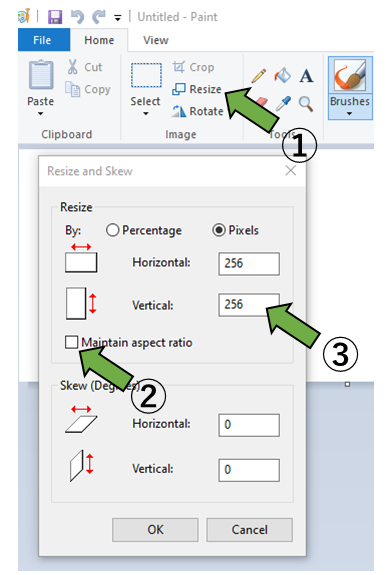
The figure above shows an example of preparing 256-pixel image using Microsoft Paint, a painting software pre-installed on Windows.
Operate as follows to create an image in a specific resolution using Microsoft Paint.
- Click on [Resize]
- Remove the check on [Maintain aspect ratio]
- Type the resolution of preference on Horizontal and Vertical input field
Press [OK], then, from [File], choose [Save As] to save the image in your preferred location.
In this example we will choose the image type [PNG (.png)].
Here are some of the major image creation software:
Photoshop, CLIPSTUDIO PAINT, GIMP
You can use any software as long as you can create an image with it.
Import the image into Unity
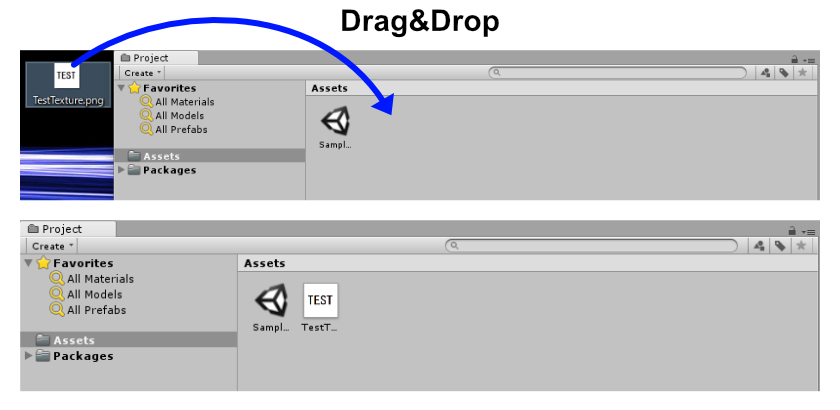
You can import the image you just created by drag & dropping it into Unity's Asset folder.
We will use it in its default settings this time, but you can find detailed information on [https://docs.unity3d.com/2018.3/Documentation/Manual/class-TextureImporter.html|Texture (Unity document)]].
Material configuration
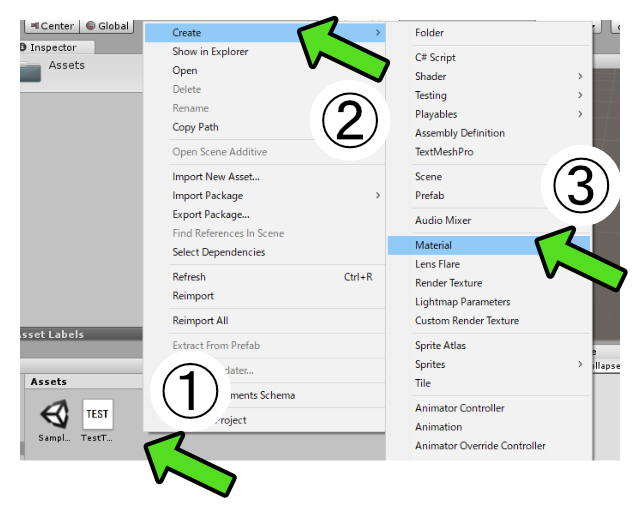
After the image is imported, we will configure a material.
Material is a collection of settings for the look of a 3D model.
The workflow to apply an image to 3D looks like this: Import an image as a texture > Create a material with the texture configured > apply the material to 3D model.
- Right-click in the Assets folder
- Select [Create] from the menu
- Click [Material] from the menu
- Input the name for the material
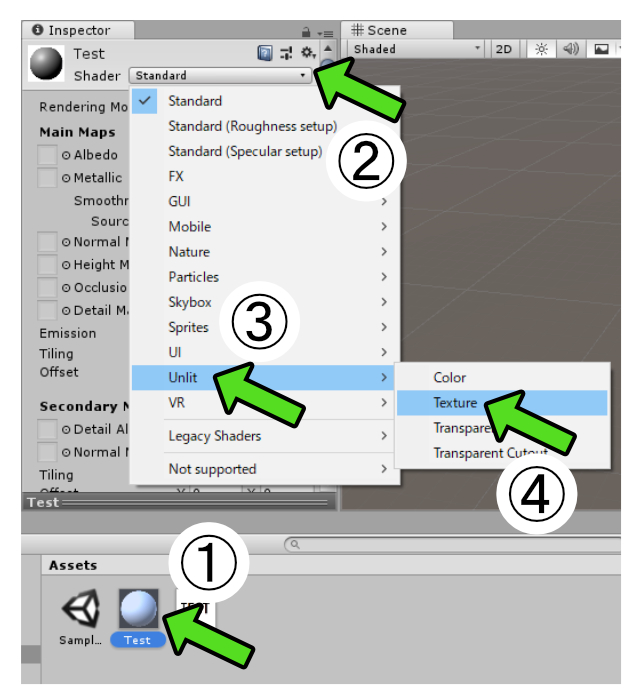
- In Assets folder, click on the material you just created
- Select [Shader] from the Inspector and show the drop-down
- Select [Unlit] from the drop-down
- Select [Texture] from the menu
* This time, we choose [Unlit/Texture] Shader for the tutorial purpose,
however, if you have VCI package already imported into the project, choose [VRM/UnlitTexture] Shader.

- Drag & drop the texture onto the Texture area in the Inspector.
Create a 3D model to apply the texture on
Let's create a 3D model to apply the texture on.
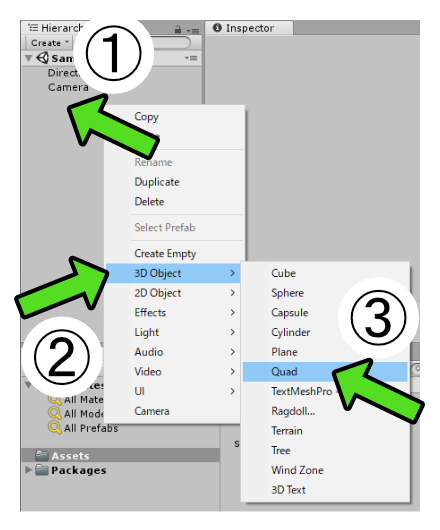
- Right-click in the Hierarchy to open context menu
- Select [3D Object]
- Click on [Quad]
- A square 3D model is created
Apply the texture on the 3D model
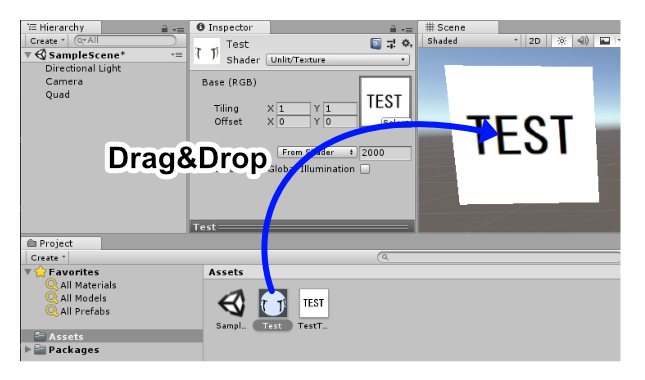
Drag & drop the material we created on to the 3D model.
The surface of the 3D model changes and we are finished.
(Supplement) How the texture works in 3D model
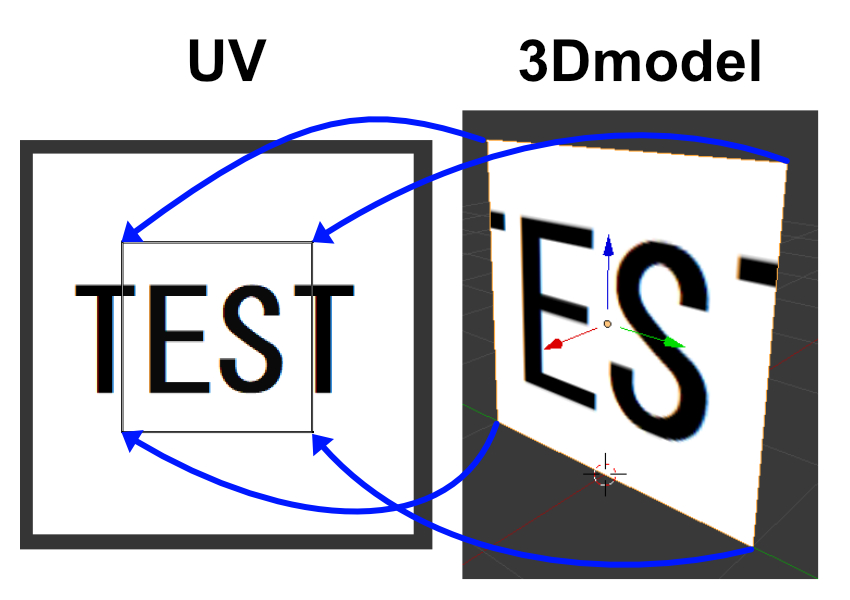
3D models contain various information such as vertex positions to depict solid.
One of the information is UV map.
A UV map is a set of information to decide how to apply textures on a 3D model.
The figure above shows the correlation between vertexes on each corner and the UV map. By specifying a UV map, Unity can decide where and which image to apply on each polygon of the 3D surface.
This means you cannot apply a texture on a 3D model that doesn't have a UV map specified.
In this example, we used a primitive in Unity. As Unity's primitives have UV map preconfigured, we were able to apply the texture without specifying UV.
en/vci/sample/image/tutorial.txt · Last modified: 2019/10/01 14:21 by h-eguchi