Table of Contents
MToon reference
What is MToon
MToon is a shader which can be used in avatars (VRM) and items (VCI).
- UniVRM github (Includes MToon)
Property
| Rendering (Mode) | |
|---|---|
| Rendering Type | Basically, use Opaque To use a transparent texture, specify “Transparent”. |
| Cull Mode | Basically, use Back. Turning this off will draw both sides of the meshes. However, this will increase the drawing cost. |
| Color (Texture) | |
| Lit Color, Alpha | Specify a texture. The color setting will be applied to the entire texture. |
| Shade Color | Specify a texture. The color setting will be applied as the color of the shadow. |
| Lighting | |
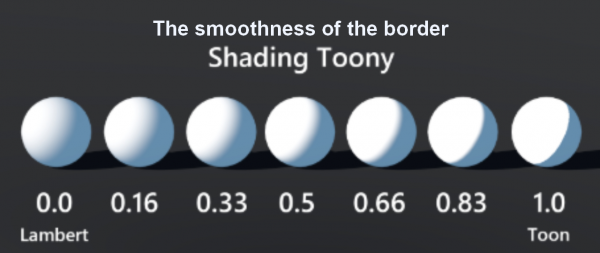
| Shading Toony | Smoothness of the borderline of the shadow. The border becomes blurry as the value comes close to 0, and it becomes sharper as the value comes close to 1. |
| Normal Map | Specify a normal map. |
| Lighting (Advanced Setting) | |
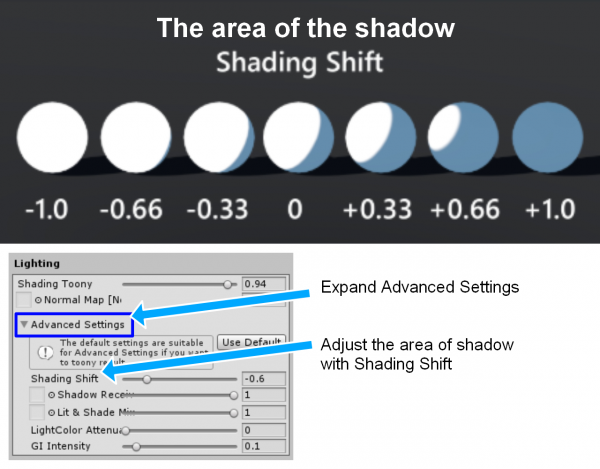
| Shading Shift | Specify the amount of area to be shaded. The shaded area becomes smaller as the value comes closer to -1, and the area becomes larger as the value comes closer to 1. |
| Shadow Receive Multiplier | Specify the area that is less affected by the shadow. It is useful when you do not want the shadow to be dropped on the face. |
| Lit & Shadow Mixing Multiplier | Specify the area that is more affected by the shadow. This item has compatibility with ShadingGradeMap in UTS2. |
| LightColor Attenuation | Specify how much the color of the light in the environment affect the material. |
| GI Intensity | Specify how much the brightness of the Global Illumination affects the material. |
| Emission | |
| Emission | Glow with the specified color (HDR). You can specify the area that doesn't glow by creating masks. |
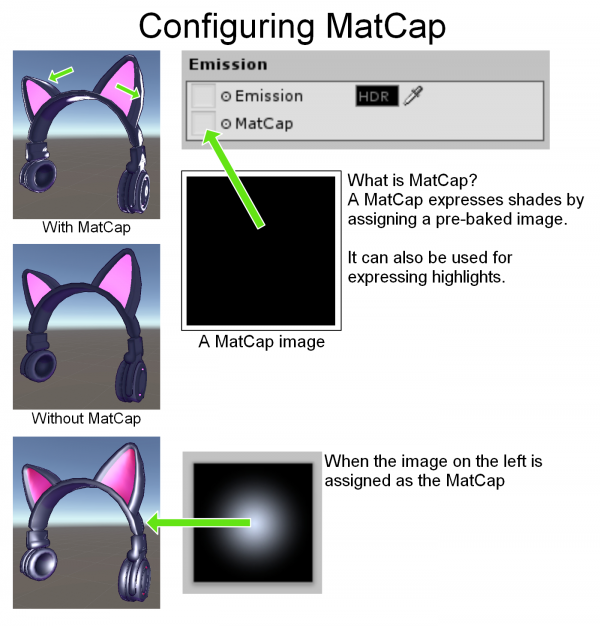
| MatCap | Specify a mat cap. |
| Rim | |
| Color | Color of the Rim light |
| Lighting Mix | How much of the color of the environmental light shall mix with the rim light |
| Fresnel Power | Larger the value, the sharper the border of the rim light |
| Lift | Larger the value, wider the area affected by the rim light |
| Outline (Width) | |
| Mode | Selecting “None” will remove the outlines. To render outlines, set it to “WorldCoordinate”. |
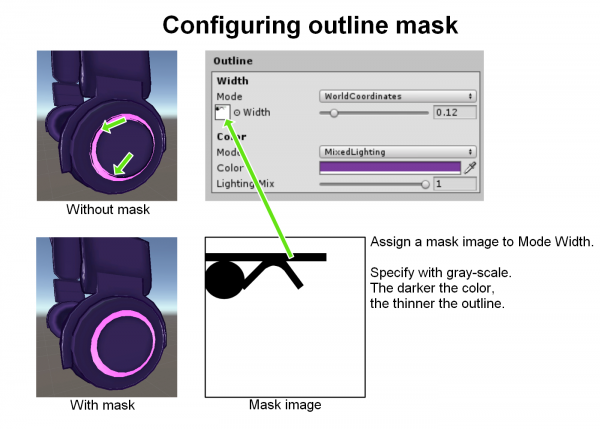
| Width | The width of the outline |
| Outline (Color) | |
| Mode | FixedColor: The outline will be rendered in the “Color”. MixedLighting: The outline will be rendered in a color which is a multiple of the texture color and the “Color”. |
| Color | Color of the outline |
| Lighting Mix | Define the mix ratio of the colors |
| UV Coordinates (Scale & offset) | |
| Tiling | Basically, specify X=1 and Y=1. |
| Offset | Slide the base point of the UV coordinate from the origin (0,0) |
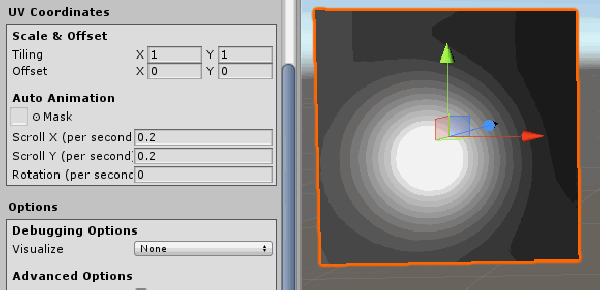
| UV Coordinates (Auto Animation) | |
| Mask | You can specify the region to scroll and not scroll the UV with a mask. |
| Scroll X (per second) | The speed at which the UV is scrolled in the X direction. The scroll direction is specified with the sign of the value. |
| Scroll Y (per second) | The speed at which the UV is scrolled in the Y direction. The scroll direction is specified with the sign of the value. |
| Rotation (per second) | The speed at which the UV is rotated. The rotation direction is specified with the sign of the value. |
| Options (Debugging Options) | |
| Visualize | Used for debugging. You can change the visibility of the shader. |
| Options (Advanced Options) | |
| Double Sided Global Illumination | |
| Render Queue | Configuration of the render order |
Detailed explanation
Rendering Type
| Rendering Type | |
|---|---|
| Opaque | Used when the entire mesh is opaque. * The default configuration |
| Cutout | Completely hides the area of the texture with its transparency less than the cutoff value. Which result in transparent areas and opaque areas. |
| Transparent | Used for transparent materials with reflections, such as glasses and plastics. |
| TransparentWithZWrite | It's basically the same as the Transparent, however, when two translucent materials overlap with each other, only the one in the front is rendered. Transparent objects are not rendered |
Cull Mode
| Cull Mode | |
|---|---|
| Back | Draw only the front side (default configuration) |
| Front | Draw only the back side. Used for reversing the sides using the shader |
| None | Draw both sides. Requires more processing power |
Culling is a technique that speeds up the rendering process by not drawing the back side of the polygons.
You may disable the culling (None) and draw both sides, but it will increase the processing burden.
ShaderLab - Culling
Shading Toony
Shading Shift
Emission
Emission is used to create glowing objects.
Here is one example of an object using the Emission.
Using emission to make glowing object with MToon
MatCap
MatCap is a technique to perform pseudo lighting by pre-baking the light
on an image and change the area to sample depending on the direction of the surface.
Outline
UV Coordinates
* Click on the image to play the animation.
You can scroll a texture by specifying speeds on Scroll X and Scroll Y.
It can be used to replicate water surface and other effects.
Here is one example of an object using UV scroll.
* Expression of light using MToon
