ExportAssets
このページは過去の情報となります。
新しいスクリプトリファレンスはこちらになります。
VCIにアタッチされたコンポーネントを扱う時の関数です。
また_ALL_が付いている関数はスタジオ内に居るユーザー全員のVCIで実行されます。
- Audio(音)の再生
- Animation(アニメーション)の再生
- MaterialのカラーやUVの変更
上3項目は、1.8.2aから、以下のページが推奨となりました。
| 名前 | 説明 | バージョン |
|---|---|---|
| GetInstanceId | EmitWithId用のIDを取得 | 2.0.0b以降 |
| GetTransform | VCI内のObjectのExportTransformを取得 | |
| GetSubItemAttractable | SubItemが引き寄せできるかどうか | |
| GetEffekseerEmitter | VCI内のObjectのエフェクトを取得 | |
| GetEffekseerEmitters | VCI内のObjectの エフェクトを取得 | |
| IsMine | VCIを出したクライアントかどうか | |
| material | VCI内のObjectのマテリアルを取得 | |
| HapticPulseOnGrabbingController | コントローラーを振動 | |
| HapticPulseOnTouchingController | コントローラーを振動 | |
| SetText | VCIのテキスト機能で使用 | |
| SetSubItemAttractable | 引き寄せの可否を設定 |
- 非推奨
-
名前 説明 GetSubItem(非推奨) vci.assets.GetTransformの使用を推奨 audio VCI内のObjectのオーディオを取得 SetMaterialColor(非推奨) vci.assets.material.SetColorの使用を推奨 SetMaterialEmissionColor(非推奨) vci.assets.material.SetEmissionColorの使用を推奨 SetMaterialTextureOffset(非推奨) vci.assets.material.SetTextureOffsetの使用を推奨 PlayAnimation(非推奨) Animationを再生 StopAnimation(非推奨) Animationを停止 PlayAudio(非推奨) Audioファイルを再生 PauseAudio(非推奨) Audioファイルを一時停止 StopAudio(非推奨) Audioファイルを停止
VCIの同期について
ネットワーク越しに動くものを考える場合、同期を意識する必要があります。
バーチャルキャストのスタジオの中にAさん、Bさん、Cさんと居た時、Aさんが動かした結果をBさん、Cさんに反映させる事を「同期させる」といいます。
一方、動かした人のパソコンでしか動かないような設定は「ローカルのみで動作する」というような言い方になります。
VCIでは主に同期させる方法は以下の通りになります。
- transformはバーチャルキャストの機能によって同期します。
_ALL_のついた関数は同期して実行されます。
Useすれば音がなる程度のシンプルなVCIであれば、イベント関数で _ALL_ を呼べば同期できます。
しかし _ALL_ の関数はネットワーク負荷が高いです。
凝った挙動を実現しようとするならvci.stateやvci.messageを使って状態を同期する必要があります。
transformの同期については VCIアイテムとSubItemについて をご確認ください。
設定出来る文字量の制限について
_ALL_SetText など、 _ALL_ で始まるAPIで設定出来る文字量は UTF-8 換算で 512 byte までとなります。
目安としてはアルファベットならば約 500 文字、日本語ならば約 250 文字となります。
大量のテキストを表示したい場合は vci.state や vci.message API を使用して同期を行う実装をしてください。
vci.message で送信出来る文字量は UTF-8 換算で 4000 byte までとなります。
vci.state で共有出来るデータ量は最大16KBまでとなります。
GetInstanceId
GetInstanceId fun(): string
- main.lua
-- 同じVCIを複数出しても自分にだけ届く
vci.message.EmitWithId("a", "message", vci.assets.GetInstanceId())
説明
EmitWithIdに用いるためのIDを取得します。
それ以外の用途は保証しません。
IDはVCIのインスタンスそれぞれに割り当てられます。
したがって同じVCIを複数出した場合はIDが異なります。
またVCIを出しなおした場合もIDが異なります。
IDはスタジオやルームのセッションの中でのユニークさが保証されます。
したがってルームの入室人数が0人になったのち再度入室した場合はIDが変わることがあります。
GetSubItem(非推奨)
GetSubItem fun(name: string): ExportTransform
サンプル1
- main.lua
local Subitem = vci.assets.GetSubItem("Subitem")

function onUse(use)
    print(Subitem.GetPosition())
    Subitem.SetPosition(Vector3.zero)
end
サンプル2
- main.lua
function onUse(use)
    print(vci.assets.GetSubItem("Subitem").GetPosition())
    vci.assets.GetSubItem("Subitem").SetPosition(Vector3.zero)
end
実行結果
(1.4, 0.2, 1.0)
useするとSubitemが(0.0, 0.0, 0.0)に移動します。

サンプル1とサンプル2で同じ動きをします。
説明
現在非推奨です。代わりにGetTransformの使用を推奨しています。
VCI内のSubItem(ExportTransform)を取得します。
詳しい使い方はExportTransformを参照してください。
GetTransform
GetTransform fun(name: string): ExportTransform
サンプル1
- main.lua
local Subitem = vci.assets.GetTransform("Subitem")

function onUse(use)
    print(Subitem.GetPosition())
    Subitem.SetPosition(Vector3.zero)
end
サンプル2
- main.lua
function onUse(use)
    print(vci.assets.GetTransform("Subitem").GetPosition())
    vci.assets.GetTransform("Subitem").SetPosition(Vector3.zero)
end
実行結果
(1.4, 0.2, 1.0)
useするとSubitemが(0.0, 0.0, 0.0)に移動します。

サンプル1とサンプル2で同じ動きをします。
説明
VCI内Objectの(ExportTransform)を取得します。
詳しい使い方はExportTransformを参照してください。
GetSubItemAttractable
GetSubItemAttractable fun(name: string): bool
サンプル
- main.lua
function onUse(use)
    print(vci.assets.GetSubItemAttractable(use))
end
実行結果
true
説明
SubItemが引き寄せできる設定かどうかを返します。
引き寄せが可能であればtrueを、不可能であればfalseを返します。
GetEffekseerEmitter
GetEffekseerEmitter fun(name: string): ExportEffekseer
サンプル
- main.lua
local SubitemEffekseer = vci.assets.GetEffekseerEmitter("Subitem")
function onUse(use)
    SubitemEffekseer.PlayOneShot()
end
実行結果
"Subitem"にアタッチされているEffekseerを一回再生する。
説明
詳しい使い方はExportEffekseer (エフェクト)を参照してください。
GetEffekseerEmitters
GetEffekseerEmitters fun(name: string): usertype
サンプル
- main.lua
local SubitemEffekseers = vci.assets.GetEffekseerEmitters("Subitem")
function onUse(use)
    SubitemEffekseers[1].PlayOneShot()
end
実行結果
"Subitem"に1番目にアタッチされているEffekseerを一回再生する。
説明
詳しい使い方はExportEffekseer (エフェクト)を参照してください。
IsMine
IsMine bool
VCI全体の所有権を取得しているか否かを bool で返します。
VCI全体の所有権を取得していると update イベントが実行されます。
詳しくはこちら。
VCI全体の所有権を取得するプレイヤーは、そのアイテムを出したプレイヤーがその場にいる限りそのプレイヤーになります。 しかし公式スタジオやルームでは、そのアイテムを出したプレイヤーがその場にいない場合があります。 そのときは、いまその場にいるプレイヤーの中から、もっとも古い時間にその場に参加したプレイヤーが選ばれVCI全体の所有権を取得します。
- main.lua
function updateAll() -- 所有権に関係なく全ユーザーに来る
    if vci.assets.IsMine then
        print("VCIの所有者です")
    end
end
実行結果
VCIの所有者です
(VCIの所有者(VCIを呼び出したユーザー)のみのConsoleにログが流れます)
audio
audio ExportAudio
サンプル
- main.lua
local Audio = vci.assets.audio
function onUse(use)
    Audio._ALL_Play("Fire", 0.5, false)
end
実行結果
"Fire"というAudioを再生する。
説明
詳しい使い方はExportAudio(オーディオ制御)を参照してください。
material
material ExportMaterial
サンプル
- main.lua
local Material = vci.assets.material
function onUse(use)
    print(Material.GetColor("CubeColor"))
end
実行結果
RGBA(1.000, 1.000, 1.000, 1.000)
説明
詳しい使い方はExportMaterial(マテリアル制御)を参照してください。
SetMaterialColor(非推奨)
SetMaterialColorFromIndex fun(index: number, color: Color)
SetMaterialColorFromName fun(name: string, color: Color)
_ALL_SetMaterialColorFromIndex fun(index: number, color: Color)
_ALL_SetMaterialColorFromName fun(name: string, color: Color)
サンプル
- main.lua
function onUse(self)
    print("onUse")
    local r = math.random()
    local g = math.random()
    local b = math.random()
    vci.assets._ALL_SetMaterialColorFromIndex(0, Color.__new(r,g,b))
end
実行結果
(アイテムを使った時に、ランダムに色を変更します)
マテリアルの色を変更します。指定方法は以下の2種類あります。
- SetMaterialColorFromIndex(マテリアル番号,Color)
- SetMaterialColorFromName(“マテリアル名”,Color)
また、Colorにはアルファ値(透明度)の指定もでき、Transparentなどのマテリアルの場合は半透明にすることもできます。
- main.lua
function onUse(self)
    print("onUse")
    local r = 1.0
    local g = 0.0
    local b = 0.0
    local a = 0.5
    vci.assets._ALL_SetMaterialColorFromIndex(0, Color.__new(r,g,b,a))
end
実行結果
(赤い半透明のマテリアルに変更します)
SetMaterialEmissionColor(非推奨)
SetMaterialEmissionColorFromIndex fun(index: number, color: Color)
SetMaterialEmissionColorFromName fun(name: string, color: Color)
_ALL_SetMaterialEmissionColorFromIndex fun(index: number, color: Color)
_ALL_SetMaterialEmissionColorFromName fun(name: string, color: Color)
サンプル
- main.lua
function onUse(self)
    print("onUse")
    local r = math.random()
    local g = math.random()
    local b = math.random()
    vci.assets._ALL_SetMaterialEmissionColorFromIndex(0, Color.__new(r,g,b))
end
実行結果
(アイテムを使った時に、ランダムにEmissionColorを変更します)
マテリアルの色を変更します。指定方法は以下の2種類あります。
- SetMaterialEmissionColorFromIndex(マテリアル番号,Color)
- SetMaterialEmissionColorFromName(“マテリアル名”,Color)
SetMaterialTextureOffset(非推奨)
SetMaterialTextureOffsetFromIndex fun(index: number, offset: Vector2)
SetMaterialTextureOffsetFromName fun(name: string, offset: Vector2)
_ALL_SetMaterialTextureOffsetFromIndex fun(index: number, offset: Vector2)
_ALL_SetMaterialTextureOffsetFromName fun(name: string, offset: Vector2)
サンプル
- main.lua
function SetCounterOffset(count)
    local offset = Vector2.zero

    -- y shift
    local Yshift = math.floor(count / 4)
    offset.y = -0.25 * Yshift

    -- x shift
    local Xshift = count % 4
    offset.x = 0.25 * Xshift

    vci.assets._ALL_SetMaterialTextureOffsetFromName("Counter", offset)
end
実行結果
(countの値に応じて、X方向にシフトすべき回数と、Y方向にシフトすべき回数を求めて、Counterを変化させます)

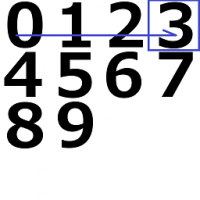
イメージとしては、4×4のグリッド状(最大16パターン)にUVをシフトさせるサンプルです。
3DモデルのUVの開始位置は左上です。
countの値が1の場合、y方向のシフト回数は0、x方向に1となり、UVが1の場所に変化します。
countの値が8の場合、y方向のシフト回数は2、x方向に0となり、UVが8の場所に変化します。
詳細な作り方はサンプルを確認してください。
→サンプル作成中※
指定方法は以下の2種類あります。
- SetMaterialTextureOffsetFromIndex(マテリアル番号,Color)
- SetMaterialTextureOffsetFromName(“マテリアル名”,Color)
PlayAnimation / StopAnimation(非推奨)
PlayAnimationFromIndex fun(index: number, isloop: bool)
PlayAnimationFromName fun(name: string, isloop: bool)
StopAnimation fun()
_ALL_PlayAnimationFromIndex fun(index: number, isloop: boolean)
_ALL_PlayAnimationFromName fun(name: string, isloop: boolean)
_ALL_StopAnimation fun()
サンプル
- main.lua
function onGrab(target)
    -- SubItemの名前毎に、再生するアニメーションを分岐する
    if target == "Subitem1" then
        vci.assets._ALL_PlayAnimationFromName("Subitem1",true) --true/false ループの可否
    end

    if target == "Subitem2" then
        vci.assets._ALL_PlayAnimationFromName("Subitem2",true) --true/false ループの可否
    end
end
実行結果
(Subitem1をつかんだ時にSubitem1が、Subitem2をつかんだ時にSubitem2のアニメーションが再生されます)
Subitemで再生するアニメーションを制御するようなサンプルです。
Subitemの名前とanimationのファイル名は一致している必要はありませんが、分かりやすくするためにサンプルではSubitemとanimationの名前を一致させています。
animationの作成や、セットアップの方法などはサンプルを参考にしてください。
→※サンプルページ作成中
PlayAudio(非推奨)
PlayAudioFromIndex fun(index: number)
PlayAudioFromName fun(name: string)
_ALL_PlayAudioFromIndex fun(index: number)
_ALL_PlayAudioFromName fun(name: string)
Audioファイルと、アニメーションファイルの名前は“gun”である必要があります。
音量はEditor実行して確認しましょう。
Unity オーディオソース
サンプル
- main.lua
function onUse(target)
    if target == "gun" then
        vci.assets._ALL_PlayAudioFromName("gun")
        vci.assets._ALL_PlayAnimationFromName("gun",false) --true/false ループの可否
    end
end
実行結果
(gunという名前のVCIをuseした時に、音と(発火のような)アニメーションを再生させます)
AudioIndex(非推奨)
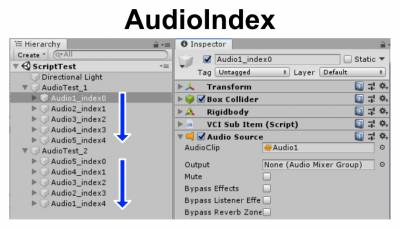
- オーディオはオーディオクリップのファイル名で指定する方法と、AudioIndexで指定する方法があります。
- AudioIndexはhierarchyの上から順に登録されてゆきます。
- Index番号は0から始まります。
- 上記の画像ではAudioTest_1のアイテムの場合、index0を指定するとAudio1が再生され、
AudioTest_2のアイテムの場合、index0を指定するとAudio5が再生されます。
PauseAudio(非推奨)
PauseAudioFromIndex fun(index: number, isPause: bool)
PauseAudioFromName fun(name: string, isPause: bool)
_ALL_PauseAudioFromIndex fun(index: number, isPause: boolean)
_ALL_PauseAudioFromName fun(name: string, isPause: boolean)
サンプル
- main.lua
local _PauseAudio = true
function onUse(use)
    if use == "Play" then
        vci.assets._ALL_PlayAudioFromName("bgm")
    end
    if use == "Pause" then
        vci.assets._ALL_PauseAudioFromName("bgm", _PauseAudio)
        _PauseAudio = not(_PauseAudio)
    end
end
実行結果
"Pause"をuseすることで音楽を一時停止することが出来ます。\\
一時停止中に再度"Pause"することで停止した場所から音楽を再生することが出来ます。\\
説明
第二引数にtrueを渡すと第一引数に渡した名前のオーディオが一時停止します。
falseを渡すと再生します。
StopAudio(非推奨)
StopAudioFromIndex fun(index: number)
StopAudioFromName fun(name: string)
_ALL_StopAudioFromIndex fun(index: number)
_ALL_StopAudioFromName fun(name: string)
サンプル
- main.lua
function onGrab()
    -- Grabした時にAudio1を再生する。
    vci.assets._ALL_PlayAudioFromName("Audio1")
end

function onUse(use)
    -- StopをUseした時にAudio1を停止する。
    if use == "Stop" then
        vci.assets._ALL_StopAudioFromName("Audio1")
        print("Stopが押されました。再生を停止します。")
    end
end
実行結果
("Stop"という名前のSubitemをUseすると、"Audio1"の再生が停止します。)
ファイル名で指定してオーディオの再生を停止します。
ファイル名は AudioSourceコンポーネント の AudioClip に割り当てられてるファイルの名前です。
HapticPulseOnGrabbingController
HapticPulseOnGrabbingController fun(target: string, strength: number, duration: number)
_ALL_HapticPulseOnGrabbingController fun(target: string, strength: number, duration: number)
サンプル
- main.lua
function onUse(use)
    -- useにはつかんだSubItemの名前が格納される
    vci.assets.HapticPulseOnGrabbingController(use, 3000, 1)
    print(use.."を使っていた場合、useしたコントローラーを振動させます")
end
実行結果
(3000の強さで1秒振動します)
引数には (振動させるSubItem, 振動の強さ, 振動の時間) をとります。
振動させるSubItemはstringで指定し、強さは0~3999までの間をとります。
HapticPulseOnGrabbingController()の実行時に指定したSubItemを使っているコントローラーが振動します。
HapticPulseOnTouchingController
HapticPulseOnTouchingController fun(target: string, strength: number, duration: number)
_ALL_HapticPulseOnTouchingController fun(target: string, strength: number, duration: number)
サンプル
- main.lua
function onUse(use)
    -- useにはつかんだSubItemの名前が格納される
    vci.assets.HapticPulseOnTouchingController(use, 3000, 1)
    print(use.."に触れていた場合、触れているコントローラーを振動させます")
end
実行結果
(useしたVCIに触れている場合、3000の強さで1秒振動します)
引数には (振動させるSubItem, 振動の強さ, 振動の時間) をとります。
振動させるSubItemはstringで指定し、強さは0~3999までの間をとります。
HapticPulseOnGrabbingController()の実行時に指定したSubItemを触れているコントローラーが振動します。
SetText
SetText fun(id: string, text: string)
_ALL_SetText fun(id: string, text: string)
第1引数:string (テキストのオブジェクト名) 第2引数:string (テキスト本文)
- 詳細は VCIのテキスト表示 を確認してください。
- 第1引数にはTextMeshProがアタッチされたオブジェクトのオブジェクト名を入れます。
- 第2引数にテキスト本文を入れます。
- 改行は “1行目\n2行目” という風に “\n” を挟む事で行えます。
サンプル
- main.lua
function update()
    local time = os.date(("%H:%M:%S"))
    -- TextItem がテキストのオブジェクト
    vci.assets.SetText("TextItem", " Time : "..tostring(time))
end
実行結果
(時刻が表示されます)
SetSubItemAttractable
SetSubItemAttractable fun(name: string, value: bool)
_ALL_SetSubItemAttractable fun(name: string, value: boolean)
サンプル
- main.lua
function onUse(use)
    print(vci.assets.GetSubItemAttractable("TestCube2"))
    vci.assets.SetSubItemAttractable("SubItem", false)
    print(vci.assets.GetSubItemAttractable("TestCube2"))
end
実行結果
一回目
true
true
二回目
false
false
三回目
false
false
vci.assets.GetSubItemAttractable(“SubItem”)の結果がfalseになります。
SubItemがアタッチされているオブジェクトに対して操作でき、SetSubItemAttractableで変更直後にvci.assets.GetSubItemAttractable(“SubItem”)を実行しても結果は変わらないので、処理を離して実装しましょう。
説明
引き寄せの可否を設定します。
trueの時、引き寄せが可能になります。
