Textをテクスチャとして活用する
Textを疑似的なテクスチャとして使用し、絵を描きます。
サンプルデータ
Unitypackage
素材データ
事前に用意する素材はりません。
コンポーネント設定
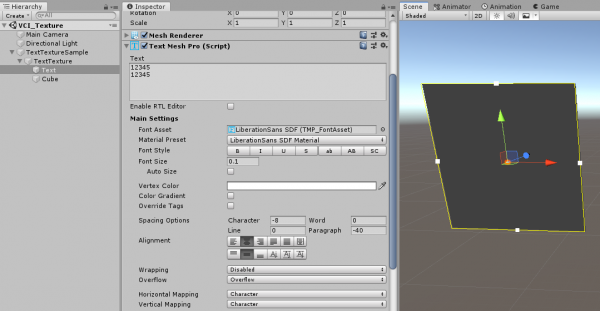
cubeは文字を見やすくするために配置しています。
テキストVCIを作成します。
[Hierarchyで右クリック] > [VCI] > [Text] から作成できるデフォルトのサイズで問題ありません。
その後、TextMeshProのコンポーネントの設定を下記のように変更します。
- FontSize → 0.1
- Spacing Options の Character → -8
- Spacing Options の Paragraph → -40
VCIスクリプト1
- main.lua
--毎フレーム更新する場合は64pixelが限度
local _textureSize = 64
local _Time = 0
local _useIsActive = false

function timeCount()
    _Time = _Time + 1
    if _Time > _textureSize then
        _Time = 0
    end
end

function update()
    --Timer
    timeCount()

    -- useを押してなければ実行
    if _useIsActive == false then
        --sinでmeterを動かす
        --meterY((math.sin(os.time()) + 1) * _textureSize * 0.5 + 0.5)

        --sinで円を描く
        circle((math.sin(os.time()) + 1) * _textureSize)
    end

end

function onUse()
    _useIsActive = true
    whiteNoise()
end

function onUnuse()
    _useIsActive = false
end

function circle(radius)

    local t = ""
    for y = 1, _textureSize do
        for x = 1, _textureSize do

            local p = "□"
            local x2 = x - _textureSize / 2
            local y2 = y - _textureSize / 2
            local r = radius / 2
            if x * x + y * y < r * r then
                p = "■"
            end

            t = t..p
        end
        t = t.."\n"
    end
    vci.assets._ALL_SetText("Text", t)

end

function meterY(value)

    local t = ""
    for y = 1, _textureSize do
        for x = 1, _textureSize do

            local p = "□"
            --描く
            if (value > y) then
                p = "■"
            end

            t = t..p
        end
        t = t.."\n"
    end
    vci.assets._ALL_SetText("Text", t)

end

function meterX(value)

    local t = ""
    for y = 1, _textureSize do
        for x = 1, _textureSize do

            local p = "□"
            --描く
            if (value > x) then
                p = "■"
            end

            t = t..p
        end
        t = t.."\n"
    end
    vci.assets._ALL_SetText("Text", t)

end

function whiteNoise()

    local t = ""
    for y = 1, _textureSize do
        for x = 1, _textureSize do

            local p = "□"
            if math.random(0,1) == 0 then
                p = "■"
            end

            t = t..p
        end
        t = t.."\n"
    end
    vci.assets._ALL_SetText("Text", t)

end
VCIスクリプト2
- main.lua
local Width = 32.0
local Height = 32.0
local Time = 0

function timeCount()
    Time = Time + 1
    if Time > 200 then
        Time = 0
    end
end

function update()
    timeCount()
    circle()
end

function sdBox(p, b)
  local q = Vector3.__new(math.abs(p.x) - b.x, math.abs(p.y) - b.y)
  local vec = Vector3.__new(math.max(q.x,0.0), math.max(q.y,0.0), math.max(q.z,0.0))
  local c = math.min(math.max(q.x,math.max(q.y,q.z)),0.0)
  vec.x = vec.x + c
  vec.y = vec.y + c
  vec.z = vec.z + c
  return Vector3.Magnitude(vec)
end

function dist(pos)
    local angle = Time / 10.0
    local pos2 =  Vector3.__new(pos.x * math.cos(angle) - pos.y * math.sin(angle), pos.x * math.sin(angle) + pos.y * math.cos(angle));
    return sdBox(pos2, Vector3.__new(0.3, 0.3, 1))
end

function circle()
    local t = ""

    local x, y

    for y = 1, Height do
        for x = 1, Width do

            local p = ""
            local x2 = (x - 0.5) / Width - 0.5
            local y2 = (y - 0.5) / Height - 0.5
            local color = 0.0

            --グラデーション
            color = dist(Vector3.__new(x2, y2)) * 20.0
            if color < 0.1 then
                p = "_"
            elseif color < 0.2 then
                p = "~"
            elseif color < 0.3 then
                p = "="
            elseif color < 0.4 then
                p = "し"
            elseif color < 0.5 then
                p = "つ"
            elseif color < 0.6 then
                p = "に"
            elseif color < 0.7 then
                p = "け"
            elseif color < 0.8 then
                p = "ぬ"
            elseif color < 0.9 then
                p = "和"
            else
                p = "親"
            end

            t = t..p
        end
        t = t.."\n"
    end
    vci.assets._ALL_SetText("Text", t)
end
VCIスクリプト(解説)
_textureSizeで縦横の大きさを決めます。Sampleでは64文字(64pixel)です。
for文を横方向に64回ループした後、改行をして次のループを行います。
これを縦方向に64回ループすると64×64の絵を描く事ができます。
左上から順に書き込まれるので左上が原点となります。
書き込まない場合は□、書き込む時は■とする事で、任意の図形になります。
漢字や記号などの2byte文字は横のサイズが同じ文字が多いので2byte文字で揃えれば正方形になります。
サンプル2は2byte文字を使用して10諧調のグラデーションを作成しています。
複数のテキストオブジェクトを重ねたりすれば3次元の表現ができたり
SubitemのPositionを引数にした表現を行ったりしても面白いかもしれません。
グラフを作成する
テキストを疑似的にテクスチャとして扱ってるので、
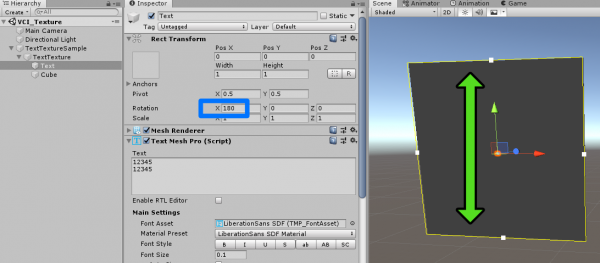
書き込み時に上から順に改行する事になってしまい原点が左上になってしまいます。
そのままでは扱いづらいので原点を左下にしたいのですが、
スクリプトで変換等しなくとも単純にテキストのオブジェクトを上下反転させれば解決できます。
上下反転した状態で改行すると上の行に移動するので、左下から詰めてく事ができます。
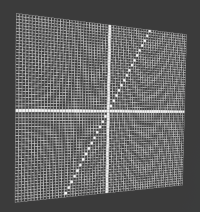
グラフのサンプル
- main.lua
local _textureSize = 64

function update()
    drawGraph()
end

function drawGraph()

    local t = ""
    for y = 1, _textureSize do
        for x = 1, _textureSize do

            local p = "□"
            -- 正中線
            if (x == _textureSize * 0.5) or (y == _textureSize * 0.5) then
                p = "■"
            end
            -- y = x のグラフ
            --[[
            if x == y then
                p = "■"
            end
            ]]
            -- y = 2x のグラフ
            if 2 * x == y + _textureSize * 0.5 then
                p = "■"
            end
            t = t..p
        end
        t = t.."\n"
    end
    vci.assets._ALL_SetText("Text", t)

end


